import cv2
import numpy as np

LABELS = ['gorani','raccoon']
#gorani, raccoon

CONFIDENCE = 0.3
THRESHOLD = 0.3  #NMS(Num Max Suppression)

net = cv2.dnn.readNetFromDarknet('C:\\animal\\yolov4_custom.cfg','C:\\animal\\yolov4_custom_final.weights')
# 파싱에러가 나는 경우 가중치, 환경구성파일의 파일경로를 지우고, 홈디렉에 옮겨놓고 실행해보면 됨

def main(img_path):
    img = cv2.imread(img_path)
    H, W, _ = img.shape
    blob = cv2.dnn.blobFromImage(img, scalefactor=1/255., size=(416, 416), swapRB=True)
    net.setInput(blob)
    output = net.forward()

    boxes, confidences, class_ids = [], [], []

    cnt = 0
    cnt2 = 0
    for det in output: #output [:4]:x,y,w,h, [5:]:score
        box = det[:4]
        #print(box)
        scores = det[5:]
        #print(scores)
        #cnt = cnt + 1
        class_id = np.argmax(scores)
        confidence = scores[class_id]
        #print(confidence)


        if confidence > CONFIDENCE:
            #print(confidence)
            #cnt2 = cnt2 + 1
            #print(box)
            cx, cy, w, h = box * np.array([W, H, W, H]) # 역정규화함
            #print(cx,cy,w,h)
            x = cx - (w / 2) # 중심찾는것
            y = cy - (h / 2) # 중심찾는것

            boxes.append([int(x), int(y), int(w), int(h)])
            confidences.append(float(confidence))
            class_ids.append(class_id)

    #Num Max Suppression # https://naknaklee.github.io/etc/2021/03/08/NMS/
    idxs = cv2.dnn.NMSBoxes(boxes, confidences, CONFIDENCE, THRESHOLD)

    if len(idxs) > 0:
        for i in idxs.flatten():
            #print(boxes) # 6개의 박스중에
            #print(i) # 3번과 4번중 4번으로 박싱을 함
            x, y, w, h = boxes[i]
            cv2.rectangle(img, pt1=(x, y), pt2=(x + w, y + h), color=(0, 0, 255), thickness=2)
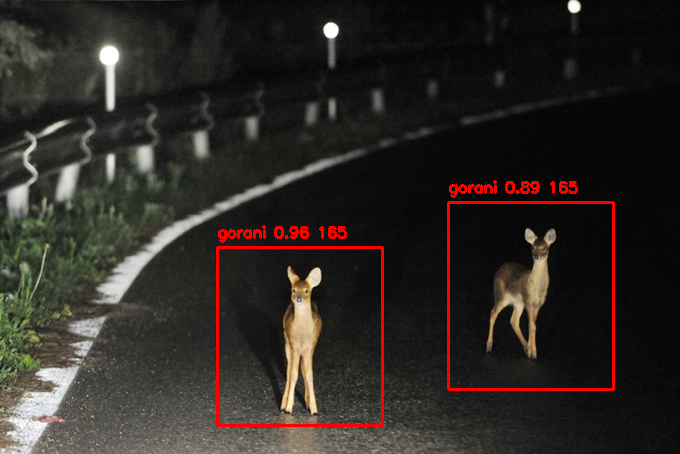
            cv2.putText(img, text='%s %.2f %d' % (LABELS[class_ids[i]], confidences[i], w), org=(x, y -10 ), fontFace=cv2.FONT_HERSHEY_SIMPLEX, fontScale=0.5, color=(0, 0, 255), thickness=2)

    cv2.imwrite('c:\\animal\\detection20.png', img)
   #print(cnt)  # 그림 한장에서 507개의 프레임을 찾음
   #print(cnt2) # cnt2 는 6장 찾음
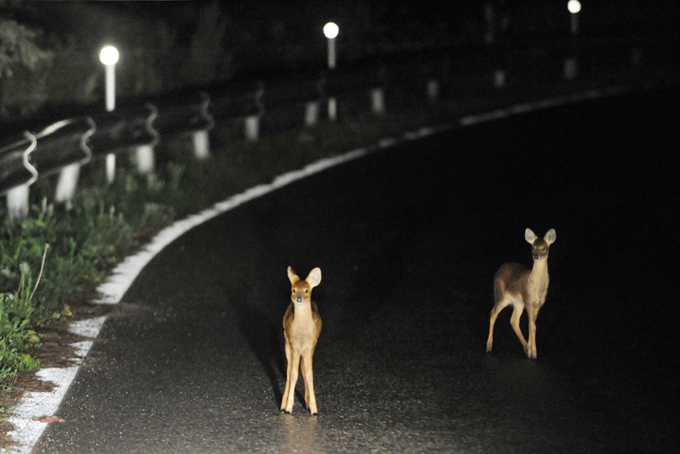
path='C:\\animal\\4.jpg'
main(path)

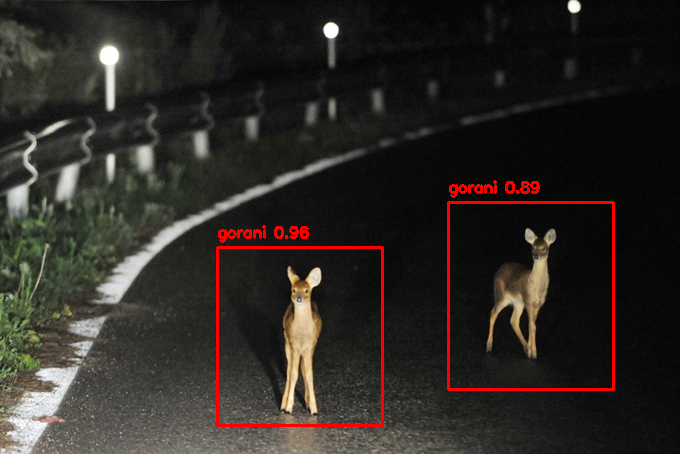
문제213. 디텍션 된 사진에서 가로의 길이는 안나오게 하시오.
아래부분 코드 수정
    if len(idxs) > 0:
        for i in idxs.flatten():
            #print(boxes) # 6개의 박스중에
            #print(i) # 3번과 4번중 4번으로 박싱을 함
            x, y, w, h = boxes[i]
            cv2.rectangle(img, pt1=(x, y), pt2=(x + w, y + h), color=(0, 0, 255), thickness=2)
            cv2.putText(img, text='%s %.2f ' % (LABELS[class_ids[i]], confidences[i]), org=(x, y -10 ), fontFace=cv2.FONT_HERSHEY_SIMPLEX, fontScale=0.5, color=(0, 0, 255), thickness=2)
ㅇ버튼 2개 넣은 gui 화면
import tkinter as tk
from tkinter import filedialog
from tkinter import *
from PIL import ImageTk, Image
from keras.models import load_model
import numpy  as  np
import cv2
import glob
from matplotlib import pyplot as plt
import os


##### 화면 생성
top = tk.Tk()
top.geometry('700x500')
top.title('Animal Object Detection')
top.configure(background='snow2')  # 창 백그라운드 색깔
#label = Label(top, background='red', font=('arial',15,'bold'))

img = Image.open('c:\\animal\\4.jpg')
img = img.resize((400, 320))
im = ImageTk.PhotoImage(img,master=top)

sign_image = Label(top, image=im)
sign_image.place(relx=0.28, rely=0.1)  #https://076923.github.io/posts/Python-tkinter-12/
                                # x 좌표의 배치 비율, y 좌표의 배치 비율


##### 화면 타이틀
heading = Label(top, text="고라니 & 너구리  Classifier", pady=20, font=('CG Omega',20,'bold'))
heading.configure(background='snow2', foreground='navy')
heading.pack()


##### 함수 생성
def upload_image():
    plt.clf()  # 현재 그림을 지웁니다.
    try:
        #label.configure(foreground='black', text='display Image ...', font=('Comic Sans MS',15))
        plt.clf() # 현재 그림을 지웁니다.
        global file_path
        file_path = filedialog.askopenfilename() # 윈도우 탐색기를 열고 파일을 선택하는 창

        uploaded = Image.open(file_path)
        uploaded = uploaded.resize((400, 320))

        im = ImageTk.PhotoImage(uploaded) # 이미지를 tk inter 창에 출력
        sign_image.configure(image=im)
        sign_image.image = im

    except:
        pass


##### 함수 생성
def detect_image():
    plt.clf()  # 현재 그림을 지웁니다.
    try:
        main(file_path)

        file_path2 = 'C:\\animal\\detection20.png'
        uploaded2 = Image.open(file_path2)
        uploaded2 = uploaded2.resize((400, 320))

        im2 = ImageTk.PhotoImage(uploaded2) # 이미지를 tk inter 창에 출력
        sign_image.configure(image=im2)
        sign_image.image = im2

    except:
        pass


##### upload 버튼 생성
upload = Button(top, text="Upload image", relief=RIDGE, command=upload_image, padx=10, pady=5)
# relief 는 버튼 스타일
upload.configure(background='mediumpurple4', foreground='white', font=('arial',12,'bold'))
# 버튼에 색깔과 폰트
upload.pack(side=TOP, padx=10, pady=10)
# 버튼을 아래쪽(BOTTOM) 위치


##### object detection 버튼 생성
upload2 = Button(top, text="Detect image", relief=RIDGE, command=detect_image, padx=10, pady=5)
# relief 는 버튼 스타일
upload2.configure(background='mediumpurple4', foreground='white', font=('arial',12,'bold'))
# 버튼에 색깔과 폰트
upload2.pack(side=BOTTOM, padx=20, pady=20)
# 버튼을 아래쪽(BOTTOM) 위치

# 사진 위치
sign_image.pack(side=BOTTOM, expand=True) # https://m.blog.naver.com/dudwo567890/130167237607
# expand=True 요구되지 않은 공간활용하기


top.mainloop()
+) 사진 바로 불러오기, 라벨링
1. main 함수
import cv2
import numpy as np

LABELS = ['gorani','raccoon']
#gorani, raccoon

CONFIDENCE = 0.3
THRESHOLD = 0.3  #NMS(Num Max Suppression)

net = cv2.dnn.readNetFromDarknet('C:\\animal\\yolov4_custom.cfg','C:\\animal\\yolov4_custom_final.weights')
# 파싱에러가 나는 경우 가중치, 환경구성파일의 파일경로를 지우고, 홈디렉에 옮겨놓고 실행해보면 됨

def main(img_path):
    img = cv2.imread(img_path)
    H, W, _ = img.shape
    blob = cv2.dnn.blobFromImage(img, scalefactor=1/255., size=(416, 416), swapRB=True)
    net.setInput(blob)
    output = net.forward()

    boxes, confidences, class_ids = [], [], []

    cnt = 0
    cnt2 = 0
    for det in output: #output [:4]:x,y,w,h, [5:]:score
        box = det[:4]
        #print(box)
        scores = det[5:]
        #print(scores)
        #cnt = cnt + 1
        class_id = np.argmax(scores)
        confidence = scores[class_id]
        #print(confidence)


        if confidence > CONFIDENCE:
            #print(confidence)
            #cnt2 = cnt2 + 1
            #print(box)
            cx, cy, w, h = box * np.array([W, H, W, H]) # 역정규화함
            #print(cx,cy,w,h)
            x = cx - (w / 2) # 중심찾는것
            y = cy - (h / 2) # 중심찾는것

            boxes.append([int(x), int(y), int(w), int(h)])
            confidences.append(float(confidence))
            class_ids.append(class_id)

    #Num Max Suppression # https://naknaklee.github.io/etc/2021/03/08/NMS/
    idxs = cv2.dnn.NMSBoxes(boxes, confidences, CONFIDENCE, THRESHOLD)

    if len(idxs) > 0:
        for i in idxs.flatten():
            #print(boxes) # 6개의 박스중에
            #print(i) # 3번과 4번중 4번으로 박싱을 함
            x, y, w, h = boxes[i]
            cv2.rectangle(img, pt1=(x, y), pt2=(x + w, y + h), color=(0, 0, 255), thickness=2)

            global class_name
            class_name = LABELS[class_ids[i]]  #라벨링 전역변수로 설정
            cv2.putText(img, text='%s %.2f ' % (LABELS[class_ids[i]], confidences[i]), org=(x, y -10 ), fontFace=cv2.FONT_HERSHEY_SIMPLEX, fontScale=0.5, color=(0, 0, 255), thickness=2)


    return img  # 이미지 return
2. 화면 구현 코드
import tkinter as tk
from tkinter import filedialog
from tkinter import *
from PIL import ImageTk, Image
from keras.models import load_model
import numpy  as  np
import cv2
import glob
from matplotlib import pyplot as plt
import os


##### 화면 생성
top = tk.Tk()
top.geometry('700x500')
top.title('Animal Object Detection')
top.configure(background='snow2')  # 창 백그라운드 색깔
#label = Label(top, background='red', font=('arial',15,'bold'))

img = Image.open('c:\\animal\\4.jpg')
img = img.resize((400, 320))
im = ImageTk.PhotoImage(img,master=top)

sign_image = Label(top, image=im)
sign_image.place(relx=0.28, rely=0.1)  #https://076923.github.io/posts/Python-tkinter-12/
                                # x 좌표의 배치 비율, y 좌표의 배치 비율

# 고라니가 발견되었습니다. 메세지 출력
label = Label(top, background='snow2', font=('arial',15,'bold'))
label.place(relx=0.28, rely=0.15)

##### 화면 타이틀
heading = Label(top, text="고라니 & 너구리  Classifier", pady=20, font=('CG Omega',20,'bold'))
heading.configure(background='snow2', foreground='navy')
heading.pack()


##### 함수 생성
def upload_image():
    plt.clf()  # 현재 그림을 지웁니다.
    try:
        #label.configure(foreground='black', text='display Image ...', font=('Comic Sans MS',15))
        plt.clf() # 현재 그림을 지웁니다.
        global file_path
        file_path = filedialog.askopenfilename() # 윈도우 탐색기를 열고 파일을 선택하는 창

        uploaded = Image.open(file_path)
        uploaded = uploaded.resize((400, 320))

        im = ImageTk.PhotoImage(uploaded) # 이미지를 tk inter 창에 출력
        sign_image.configure(image=im)
        sign_image.image = im

    except:
        pass


##### 함수 생성
def detect_image():
    plt.clf()  # 현재 그림을 지웁니다.
    try:
        uploaded2 = main(file_path)  # main에서 img 정보를 가져옴
        uploaded2 = cv2.cvtColor(uploaded2, cv2.COLOR_BGR2RGB)  # BGR에서 RGB로 변환
        uploaded2 = Image.fromarray(uploaded2)  # PIL에 맞는 형식으로 변환
        uploaded2 = uploaded2.resize((400, 320))  #리사이즈

        im2 = ImageTk.PhotoImage(uploaded2) # 이미지를 tk inter 창에 출력
        sign_image.configure(image=im2)
        sign_image.image = im2
        label.configure(foreground = 'black', text = '%s 발견!!'%class_name, font=('CG Omega',20,'bold'))  #라벨링 추가


    except:
        pass


##### upload 버튼 생성
upload = Button(top, text="Upload image", relief=RIDGE, command=upload_image, padx=10, pady=5)
# relief 는 버튼 스타일

upload.place(relx=0.2, rely=0.9)

upload.configure(background='mediumpurple4', foreground='white', font=('arial',12,'bold'))
# 버튼에 색깔과 폰트
#upload.pack(side=BOTTOM, padx=10, pady=10) # 위에 place 가 있어서 주석처리함
# 버튼을 위쪽(TOP) 위치 , padx 와 pady 는 버튼의 여백을 설정하는 것입니다.
# TOP, RIGHT, LEFT, BOTTOM 은 전부 대문자로 적어줘야합니다.

##### object detection 버튼 생성
upload2 = Button(top, text="Detect image", relief=RIDGE, command=detect_image, padx=10, pady=5)
# relief 는 버튼 스타일
upload2.configure(background='mediumpurple4', foreground='white', font=('arial',12,'bold'))
# 버튼에 색깔과 폰트

upload2.place(relx=0.6, rely=0.9)

#upload2.pack(side=BOTTOM, padx=20, pady=20) # 위에 place 가 있어서 주석처리함
# 버튼을 아래쪽(BOTTOM) 위치

# 사진(sing_image) 을 tkinter 창에 packing(붙임) 합니다.
sign_image.pack(side=BOTTOM, expand=True) # https://m.blog.naver.com/dudwo567890/130167237607
# expand=True 요구되지 않은 공간활용하기


top.mainloop()
반응형
'Study > class note' 카테고리의 다른 글
| 딥러닝 / 동영상 object detection 주석 설명 (0) | 2022.05.09 |
|---|---|
| 딥러닝 / 동영상 object detection (0) | 2022.05.06 |
| 딥러닝 / 고라니, 너구리 디텍션2 (0) | 2022.05.04 |
| 딥러닝 / object detection 주피터에서 실행하기2, 고라니와 너구리 디텍션 (0) | 2022.05.03 |
| 딥러닝 / object detection 주피터에서 실행하기 (0) | 2022.05.02 |
