python / 웹스크롤링 감성분석
ㅇ웹크롤링할때 예외처리하는 방법
def naver_blog(keyword,page_num):

    # 모듈
    from selenium import webdriver
    from selenium.webdriver.common.keys import Keys
    from bs4 import BeautifulSoup
    from urllib import request as urlreq
    import time
    import re

    # 크롬 드라이버
    binary = "C:\\data\\chromedriver_win32\\chromedriver.exe"

    # 브라우저를 인스턴스화
    driver = webdriver.Chrome(binary)

    params = []
    for i in range(1,page_num+1):
        url = "https://section.blog.naver.com/Search/Post.naver?pageNo="+str(i)+"&rangeType=ALL&orderBy=sim&keyword="+keyword
        driver.get(url)
        time.sleep(1)
        html = driver.page_source

        soup = BeautifulSoup(html,'html.parser')
        base = soup.select('div.desc > a')
        for i in base:
            params.append(i.get('href'))

    params2 = list(set(params))

    from tqdm import tqdm_notebook  # 속도 진행상황

    f2 = open("c:\\data\\"+keyword+".txt","w",encoding = "utf8")

    for k in tqdm_notebook(params2):
        driver = webdriver.Chrome(binary)
        driver.get(k)

        element = driver.find_element_by_id("mainFrame") #iframe 태그 엘리먼트 찾기
        driver.switch_to.frame(element)

        html2 = driver.page_source

        soup2 = BeautifulSoup(html2, 'html.parser')

        #닉네임 크롤링
        try:
            overlays = ".nick"
            nick = driver.find_element_by_css_selector(overlays)   # 셀레니엄 메소드로 태그 찾기
            nickname = nick.text
            nickname = re.sub('[\n\r\t]','',nickname)

        #날짜 크롤링

            overlays = ".se_publishDate.pcol2"
            date = driver.find_element_by_css_selector(overlays)
            datetime = date.text

        #내용 크롤링
            content = soup2.select('div.se-component-content>div>div>p')

            f2.write('\n\nurl주소 : '+k)  # url 쓰기
            f2.write('\n작성날짜: ' + datetime) # 날짜쓰기
            f2.write('\n블로그 작성자['+nickname +']\n')  # 닉네임 쓰기

            for i in content:
                if len(i.text) > 1:
                    f2.write(re.sub('[\n\r\t]','',i.text)+'\n')  # 내용 크롤링하면서 쓰기
        except:
            continue  # 예외처리 continue~

        driver.quit()


    f2.close()
146 웹스크롤링 실전4 (네이버 블러그 감성분석)
# 1. 파일불러오기

positive = open("c:\\data\\pos_pol_word.txt",encoding='utf-8-sig')
pos= set(positive.read().split('\n'))   # 중복제거
pos = list(filter((lambda x : x), pos))     # 결측치 제거

negative = open("c:\\data\\neg_pol_word.txt",encoding='utf-8-sig')
neg= set(negative.read().split('\n'))
neg = list(filter((lambda x : x), neg))

lady = open("c:\\data\\할매떡볶이.txt", encoding = 'utf8')
lady2 = lady.read()

# 2. 단어 정제
pos = list(filter((lambda x: len(x)>1),pos))  # 한 글자 단어 제외처리
pos.remove('^^')
pos.remove('ㅎㅎ')

neg.append('느끼') # 부정어 딕셔너리에 데이터 추가
neg.append('물리')
neg = list(filter((lambda x: len(x)>1),neg)) # 제외처리
neg.remove('저는')
neg.remove('마약')
neg.remove(':)')
neg.remove('ㅠㅠ ')
neg.remove(':/')
neg.remove('ㅠ_ㅠ')

# 3. 데이터 프레임을 만들기 위한 딕셔너리 생성
pos_dict = {}
pos_dict['word'] = []
pos_dict['cnt'] = []

neg_dict = {}
neg_dict['word'] = []
neg_dict['cnt'] = []

# 4. 데이터 입력
for i in pos:
    if i in lady2:
        pos_dict['word'].append(i)
        pos_dict['cnt'].append(lady2.count(i))

for i in neg:
    if i in lady2:
        neg_dict['word'].append(i)
        neg_dict['cnt'].append(lady2.count(i))

# 5. 판다스 데이터 프레임 생성
import pandas as pd
pd.set_option('display.max_rows', None)  # 모든 행을 다 볼 수 있게 펼침

df_pos= pd.DataFrame(pos_dict)   # 긍정단어 데이터프레임
df_pos['순위'] = df_pos['cnt'].rank(ascending = False).astype('int')
df_pos[:][df_pos['순위'] <= 50].sort_values(by = ['순위'], ascending = True)

# df_neg = pd.DataFrame(neg_dict)   # 부정단어 데이터프레임
# df_neg['순위'] = df_neg['cnt'].rank(ascending = False).astype('int')
# df_neg[:][df_neg['순위'] <= 20].sort_values(by = ['순위'], ascending = True)
문재444. 아래와 같이 함수를 실행하면 분석하고 싶은 리스트가 나오게 코드를 작성하시오
my_data_visual()
1. 중앙일보 기사 데이터 스크롤링
2. 네이버 블로그 데이터 스크롤링
3. 긍정, 부정단어 감성 분석
번호를 선택하세요~
def my_data_visual():
    print('''
    ========= DATA SERVICE =========
    1. 중앙일보 기사 데이터 스크롤링
    2. 네이버 블로그 데이터 스크롤링
    3. 긍정, 부정단어 감성분석
    ================================
    ''')

    num = int(input('번호를 선택하세요~ \t'))

my_data_visual()
문제445. 위에 함수를 실행했을 때 1번을 누르면 아래의 메시지가 나오게하고 기사들을 스크롤링하게 하시오.
def my_data_visual():
    print('''
    ========= DATA SERVICE =========
    1. 중앙일보 기사 데이터 스크롤링
    2. 네이버 블로그 데이터 스크롤링
    3. 긍정, 부정단어 감성분석
    ================================
    ''')

    num = int(input('번호를 선택하세요 ▶ '))

    if num == 1:  # 중앙일보 선택
        keyword = input('키워드를 입력하세요 ▶ ')
        btn_num = int(input('더보기를 몇 번 누를까요? ▶ '))

        joongang(keyword, btn_num)

        print("c:\\data\\joongang_"+keyword+"에 저장되었습니다.")

    elif num == 2: # 네이버 블로그 선택
        keyword = input('키워드를 입력하세요 ▶ ')
        page_num = int(input('페이지 몇 번까지 누를까요? ▶ '))

        naver_blog(keyword,page_num)

        print("c:\\data\\naver_blog_"+keyword+"에 저장되었습니다.")

    elif num == 3: # 감성분석
        keyword = input('분석할 파일명을 입력하세요.(예시 : 떡군이네.txt) ▶ ')

        word(keyword)

    else:
        print('번호를 잘못 입력했습니다.')
개별 함수까지 작성한 전체 코드
# 1. 중앙일보 분석 함수
def joongang(keyword, btn_num):
    from selenium.webdriver.common.keys import Keys # 키보드를 컴퓨터가 알아서 조정할 수 있도록 키 제공
    from  selenium  import  webdriver # 컴퓨터가 알아서 웹페이지를 움직일 수 있도록 하는 모듈
    from  bs4  import  BeautifulSoup  # html 코드에서 우리가 원하는 텍스트를 가져오게 하는 모듈
    import  urllib # url주소를 파이썬이 인식할 수 있도록 하는 모듈
    import   re # 데이터 정제 전문 모듈
    import time # 중간중간 sleep을 걸어서 서버에 부하를 주지 않게 함
     # 스크롤바를 내렸을때 바로 화면이 뜨지 않고 딜레이가 생김 > 그걸 기다리기 위한 시간이기도 함

    # 인공지능으로 중앙일보에서 검색했을때 나오는 페이지의 html 코드를 가져옵니다.
    list_url ="https://www.joongang.co.kr/search/news?keyword="+ keyword

    driver = webdriver.Chrome("C:\\data\\chromedriver_win32\\chromedriver.exe") # 크롬드라이버 불러옴
    driver.implicitly_wait(10) # 10초 기다림
    driver.get(list_url) # 위의 url을 가져옴

    for i in range(1,btn_num+1): # 반복하겠음. 무한반복하고 싶은 경우 while문 쓰면 됨.
        더보기 = driver.find_element_by_css_selector('a.btn.btn_outline_gray')
        더보기.send_keys('\n')  # 더보기 엔터를 쳐서 클릭하게 함
        time.sleep(3) # 기사로딩을 위해 3초 기다림
        driver.find_element_by_xpath("//body").send_keys(Keys.PAGE_DOWN)  # 페이지 다운


    html = driver.page_source   # 크롬브라우져에서 현재 불러온 html소스를 가져옴
    soup = BeautifulSoup(  html, "html.parser") # html코드를 BeautifulSoup으로 파싱함

    base = soup.select("h2.headline > a")  # html코드에서 h2 태그의 headline 클래스의 자식 테그인
                                            # a 태그의 html 문서들을 가져와라
    params=[] # 상세기사 url담을 리스트
    for  i  in  base[5:-5]:  #  중앙일보의 경우는 많이 본 뉴스가 상위 5개, 하위 5개를 제외
        params.append(i.get("href"))  #   a 태그 안에 있는 href 의 상세 url 을 가져옵니다.

    # 기사 본문 가져와서 저장
    f2 = open("c:\\data\\joongang_"+keyword+".txt","w",encoding = 'utf8')
    cnt = 0
    for i in params:  # # 상세 url for문으로 돌리기
        url = urllib.request.Request(i)
        f = urllib.request.urlopen(url).read().decode("utf-8")

        soup2 = BeautifulSoup(f, "html.parser")

        for k in soup2.find_all("div", class_ = "article_body fs3"):
            cnt+=1
            f2.write(str(cnt)+'. ' + re.sub('[\n\r\t]','',k.text)+'\n\n')

    f2.close()
    driver.quit()  # 브라우저를 닫음


# 2. 네이버 블로그 분석 함수
def naver_blog(keyword,page_num):

    # 모듈
    from selenium import webdriver
    from selenium.webdriver.common.keys import Keys
    from bs4 import BeautifulSoup
    from urllib import request as urlreq
    import time
    import re

    # 크롬 드라이버
    binary = "C:\\data\\chromedriver_win32\\chromedriver.exe"

    # 브라우저를 인스턴스화
    driver = webdriver.Chrome(binary)

    params = []
    for i in range(1,page_num+1):
        url = "https://section.blog.naver.com/Search/Post.naver?pageNo="+str(i)+"&rangeType=ALL&orderBy=sim&keyword="+keyword
        driver.get(url)
        time.sleep(1)
        html = driver.page_source

        soup = BeautifulSoup(html,'html.parser')
        base = soup.select('div.desc > a')
        for i in base:
            params.append(i.get('href'))

    params2 = list(set(params))

    from tqdm import tqdm_notebook  # 속도 진행상황

    f2 = open("c:\\data\\naver_blog_"+keyword+".txt","w",encoding = "utf8")

    for k in tqdm_notebook(params2):
        driver = webdriver.Chrome(binary)
        driver.get(k)

        element = driver.find_element_by_id("mainFrame") #iframe 태그 엘리먼트 찾기
        driver.switch_to.frame(element)

        html2 = driver.page_source

        soup2 = BeautifulSoup(html2, 'html.parser')

        #닉네임 크롤링
        try:
            overlays = ".nick"
            nick = driver.find_element_by_css_selector(overlays)   # 셀레니엄 메소드로 태그 찾기
            nickname = nick.text
            nickname = re.sub('[\n\r\t]','',nickname)

        #날짜 크롤링

            overlays = ".se_publishDate.pcol2"
            date = driver.find_element_by_css_selector(overlays)
            datetime = date.text

        #내용 크롤링
            content = soup2.select('div.se-component-content>div>div>p')

            f2.write('\n\nurl주소 : '+k)  # url 쓰기
            f2.write('\n작성날짜 : ' + datetime) # 날짜쓰기
            f2.write('\n블로그 작성자 : '+nickname +'\n')  # 닉네임 쓰기

            for i in content:
                if len(i.text) > 1:
                    f2.write(re.sub('[\n\r\t]','',i.text)+'\n')  # 내용 크롤링하면서 쓰기
        except:
            continue  # 예외처리 continue~

        driver.quit()


    f2.close()


# 3. 긍정,부정단어 감성분석
def word(keyword):
    # 1. 파일불러오기
    positive = open("c:\\data\\pos_pol_word.txt",encoding='utf-8-sig')
    pos= set(positive.read().split('\n'))   # 중복제거
    pos = list(filter((lambda x : x), pos))     # 결측치 제거

    negative = open("c:\\data\\neg_pol_word.txt",encoding='utf-8-sig')
    neg= set(negative.read().split('\n'))
    neg = list(filter((lambda x : x), neg))

    f = open("c:\\data\\"+keyword, encoding = 'utf8')
    f2 = f.read()

    # 2. 단어 정제
    pos = list(filter((lambda x: len(x)>1),pos))  # 한 글자 단어 제외처리
    pos.remove('^^')
    pos.remove('ㅎㅎ')

    neg.append('느끼') # 부정어 딕셔너리에 데이터 추가
    neg.append('물리')
    neg = list(filter((lambda x: len(x)>1),neg)) # 제외처리
    neg.remove('저는')
    neg.remove('마약')
    neg.remove(':)')
    neg.remove('ㅠㅠ ')
    neg.remove(':/')
    neg.remove('ㅠ_ㅠ')

    # 3. 데이터 프레임을 만들기 위한 딕셔너리 생성
    pos_dict = {}
    pos_dict['word'] = []
    pos_dict['cnt'] = []

    neg_dict = {}
    neg_dict['word'] = []
    neg_dict['cnt'] = []

    # 4. 데이터 입력
    for i in pos:
        if i in f2:
            pos_dict['word'].append(i)
            pos_dict['cnt'].append(f2.count(i))

    for i in neg:
        if i in f2:
            neg_dict['word'].append(i)
            neg_dict['cnt'].append(f2.count(i))

    # 5. 판다스 데이터 프레임 생성
    import pandas as pd

    pd.set_option('display.max_rows', None)  # 모든 행을 다 볼 수 있게 펼침

    df_pos = pd.DataFrame(pos_dict)   # 긍정단어 데이터프레임
    df_pos['순위'] = df_pos['cnt'].rank(ascending = False).astype('int')
    df_pos_rst = df_pos[:][df_pos['순위'] <= 100].sort_values(by = ['순위'], ascending = True)

    df_neg = pd.DataFrame(neg_dict)   # 부정단어 데이터프레임
    df_neg['순위'] = df_neg['cnt'].rank(ascending = False).astype('int')
    df_neg_rst = df_neg[:][df_neg['순위'] <= 100].sort_values(by = ['순위'], ascending = True)

    df_rst = [df_pos_rst,df_neg_rst] # 데이터 합치기
    df_rst2 = pd.concat(df_rst,keys=['positive','negative']) # 데이터프레임 라벨링

    print(df_rst2) # 판다스 데이터 프레임으로 return이 안됨 > 방법찾아야함


# 4. 데이터 분석 메인 함수
def my_data_visual():
    print('''
    ========= DATA SERVICE =========
    1. 중앙일보 기사 데이터 스크롤링
    2. 네이버 블로그 데이터 스크롤링
    3. 긍정, 부정단어 감성분석
    ================================
    ''')

    num = int(input('번호를 선택하세요 ▶ '))

    if num == 1:  # 중앙일보 선택
        keyword = input('키워드를 입력하세요 ▶ ')
        btn_num = int(input('더보기를 몇 번 누를까요? ▶ '))

        joongang(keyword, btn_num)

        print("c:\\data\\joongang_"+keyword+"에 저장되었습니다.")

    elif num == 2: # 네이버 블로그 선택
        keyword = input('키워드를 입력하세요 ▶ ')
        page_num = int(input('페이지 몇 번까지 누를까요? ▶ '))

        naver_blog(keyword,page_num)

        print("c:\\data\\naver_blog_"+keyword+"에 저장되었습니다.")

    elif num == 3: # 감성분석
        keyword = input('분석할 파일명을 입력하세요.(예시 : 떡군이네.txt) ▶ ')

        word(keyword)

    else:
        print('번호를 잘못 입력했습니다.')
147 웹스크롤링 실전5 (워드 클라우드)
워드 클라우드로 시각화를 하게 되면 한눈에 단어의 빈도수를 확인하기가 유용
특히 긍정, 부정에 대한 단어들을 확인할 때 좋음.
예제1. c:\\ 밑에 project 라는 파일을 만들기
예제2. 아나콘다 프롬프트 창을 열고 wordcloud 패키지 설치
conda install wordcloud
	# 또는
pip install wordcloud
	# 또는
conda install -c conda-forge wordcloud=1.8.1  # 얘로 설치됨


##### 설치 되었는지 확인하는 방법
conda list wordcloud
예제3. 카페 데이터 게시판에서 필요한 파일 다운로드
- usa_im.png <= 배경 이미지
- s_korea.png
- word.txt <= 워드 클라우드 그릴때 제외할 단어들
예제4. 워드 클라우드 시각화
# 텍스트마이닝 데이터 정제

from wordcloud import WordCloud, STOPWORDS  # 시각화, 데이터 정제를 위한 모듈
import matplotlib.pyplot as plt  # 그래프 그리는 모듈
from os import path     #  os 에 있는 파일을 파이썬에서 인식하기 위해서
import re   #  데이터 정제를 위한 모듈
import numpy as np
from PIL import Image  # 이미지 시각화를 위한 모듈

# 워드 클라우드의 배경이 되는 이미지 모양을 결정
usa_mask = np.array(Image.open("c:/project/usa_im.png"))

# 워드 클라우드를 그릴 스크립트 이름 설정
script = "떡군이네700.txt"

# 워드 클라우드 그림이 저장될 작업 디렉토리를 설정
d = path.dirname("c:/project/")

# 워드 클라우드를 그릴 스크립트와 os의 위치를 연결하여 utf8로 인코딩해서 한글 텍스트를
# text 변수로 리턴한다.
text = open(path.join(d, "%s"%script), mode="r", encoding="utf-8").read()

# 너무 공통적으로 자주 나오는 단어들을 제거하기 위한 작업
file = open('c:/project/word.txt', 'r', encoding = 'utf-8')
word = file.read().split(' ')   # 어절별로 분리함
for i in word:
    text = re.sub(i,'',text)      # 스크립트에서 word 에 있는 단어들을 전부 null 로 변경한다.

# 워드 클라우드를 그린다.
wordcloud = WordCloud(font_path='C://Windows//Fonts//gulim', # 글씨체
                      stopwords=STOPWORDS,   # 마침표, 느낌표,싱글 쿼테이션 등을 정제
                      max_words=1000, # 워드 클라우드에 그릴 최대 단어갯수
                      background_color='white', # 배경색깔
                      max_font_size = 100, # 최대 글씨 크기
                      min_font_size = 1, # 최소 글씨
                      mask = usa_mask, # 배경 모양
                      colormap='jet').generate(text).to_file('c:/project/yys_cloud.png')
                  # c 드라이브 밑에 project 폴더 밑에 생성되는 워드 클라우드 이미지 이름

plt.figure(figsize=(15,15))            # 워드 클라우드의 가로 세로 사이즈
plt.imshow(wordcloud, interpolation='bilinear')  # 글씨가 퍼지는 스타일
plt.axis("off")
문제448. 할매떡볶이.txt로 워드 클라우드를 그려보세요.
# 텍스트마이닝 데이터 정제

from wordcloud import WordCloud, STOPWORDS  # 시각화, 데이터 정제를 위한 모듈
import matplotlib.pyplot as plt  # 그래프 그리는 모듈
from os import path     #  os 에 있는 파일을 파이썬에서 인식하기 위해서
import re   #  데이터 정제를 위한 모듈
import numpy as np
from PIL import Image  # 이미지 시각화를 위한 모듈

# 워드 클라우드의 배경이 되는 이미지 모양을 결정
usa_mask = np.array(Image.open("c:/project/usa_im.png"))

# 워드 클라우드를 그릴 스크립트 이름 설정
script = "할매떡볶이.txt"

# 워드 클라우드 그림이 저장될 작업 디렉토리를 설정
d = path.dirname("c:/project/")

# 워드 클라우드를 그릴 스크립트와 os의 위치를 연결하여 utf8로 인코딩해서 한글 텍스트를
# text 변수로 리턴한다.
text = open(path.join(d, "%s"%script), mode="r", encoding="utf-8").read()

# 너무 공통적으로 자주 나오는 단어들을 제거하기 위한 작업
file = open('c:/project/word.txt', 'r', encoding = 'utf-8')
word = file.read().split(' ')   # 어절별로 분리함
for i in word:
    text = re.sub(i,'',text)      # 스크립트에서 word 에 있는 단어들을 전부 null 로 변경한다.

# 워드 클라우드를 그린다.
wordcloud = WordCloud(font_path='C://Windows//Fonts//gulim', # 글씨체
                      stopwords=STOPWORDS,   # 마침표, 느낌표,싱글 쿼테이션 등을 정제
                      max_words=1000, # 워드 클라우드에 그릴 최대 단어갯수
                      background_color='white', # 배경색깔
                      max_font_size = 100, # 최대 글씨 크기
                      min_font_size = 1, # 최소 글씨
                      mask = usa_mask, # 배경 모양
                      colormap='jet').generate(text).to_file('c:/project/yys_cloud.png')
                  # c 드라이브 밑에 project 폴더 밑에 생성되는 워드 클라우드 이미지 이름

plt.figure(figsize=(15,15))            # 워드 클라우드의 가로 세로 사이즈
plt.imshow(wordcloud, interpolation='bilinear')  # 글씨가 퍼지는 스타일
plt.axis("off")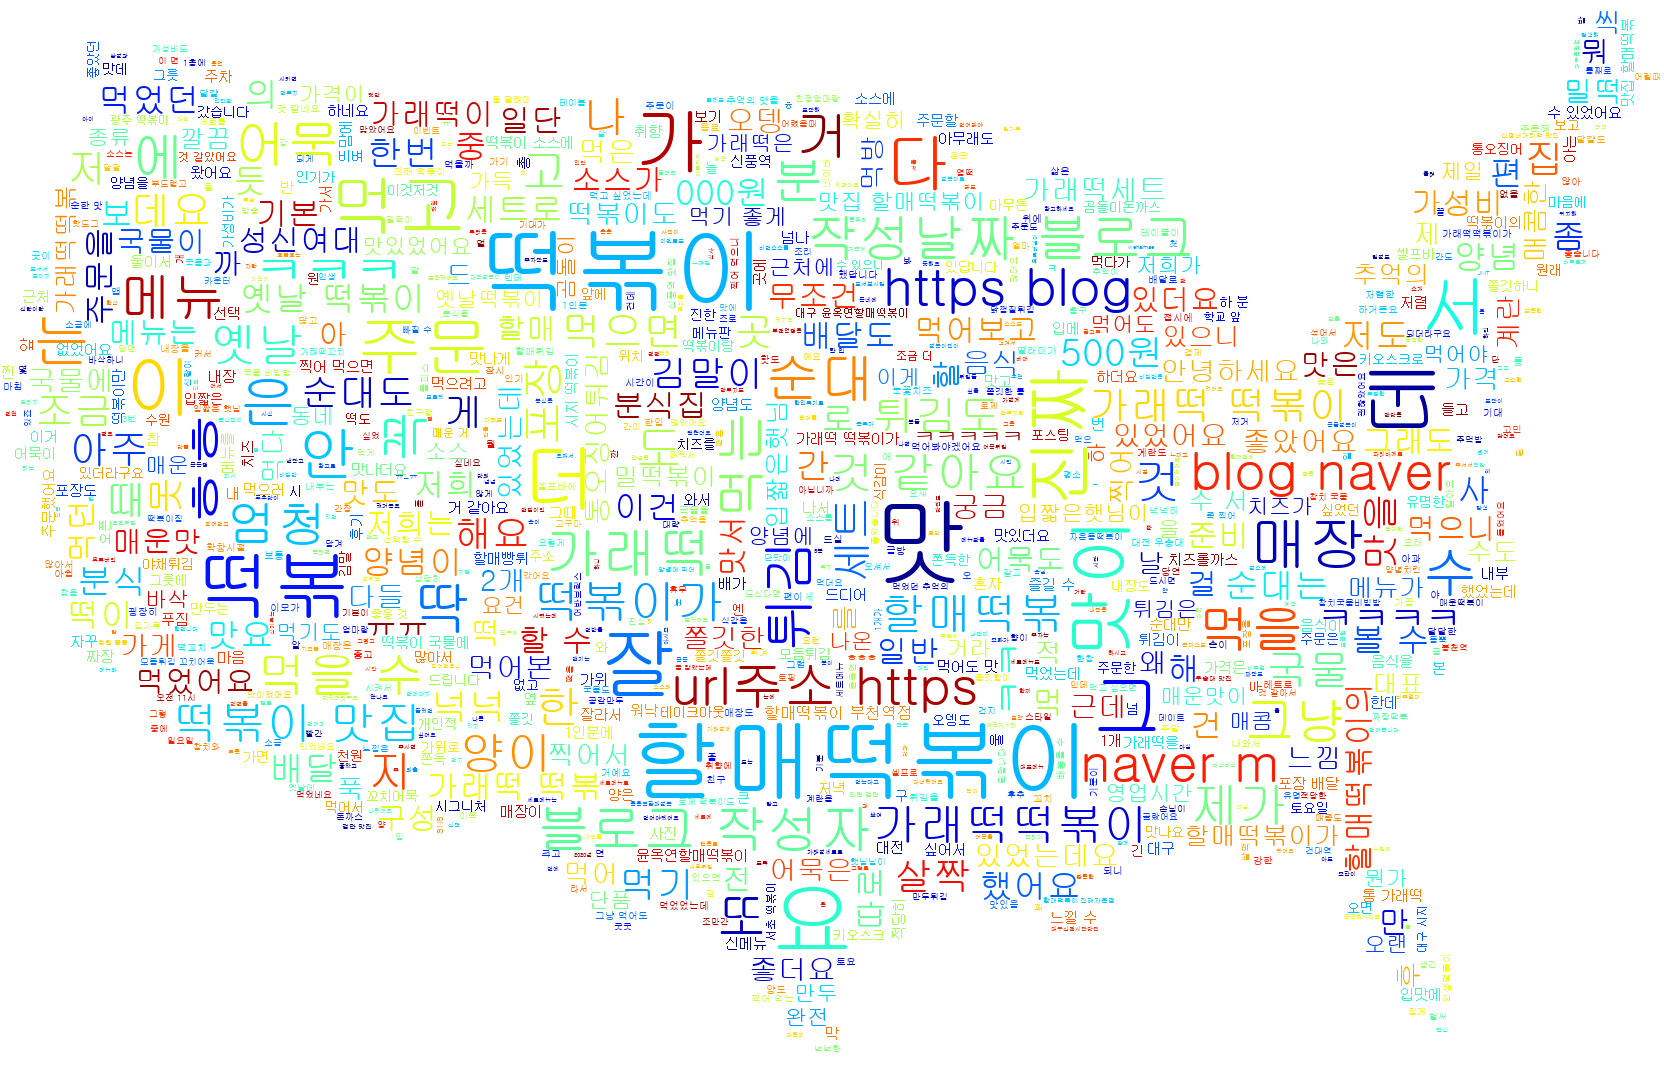
문제449. 위의 코드를 가지고 함수를 만들어서 실행되게 하시오.
def wordcloud2():

    ss = "c:\\data\\"
    f = input('파일명을 입력하세요~(예 : 할매떡볶이.txt) ▶')

    # 텍스트마이닝 데이터 정제

    from wordcloud import WordCloud, STOPWORDS  # 시각화, 데이터 정제를 위한 모듈
    import matplotlib.pyplot as plt  # 그래프 그리는 모듈
    from os import path     #  os 에 있는 파일을 파이썬에서 인식하기 위해서
    import re   #  데이터 정제를 위한 모듈
    import numpy as np
    from PIL import Image  # 이미지 시각화를 위한 모듈

    # 워드 클라우드의 배경이 되는 이미지 모양을 결정
    usa_mask = np.array(Image.open("c:/project/usa_im.png"))

    # 워드 클라우드를 그릴 스크립트 이름 설정
    script = ss + f

    # 워드 클라우드를 그릴 스크립트와 os의 위치를 연결하여 utf8로 인코딩해서 한글 텍스트를
    # text 변수로 리턴한다.
    text = open( script , mode="r", encoding="utf-8").read()

    # 너무 공통적으로 자주 나오는 단어들을 제거하기 위한 작업
    file = open('c:/project/word.txt', 'r', encoding = 'utf-8')
    word = file.read().split(' ')   # 어절별로 분리함

    for i in word:
        text = re.sub(i,'',text)      # 스크립트에서 word 에 있는 단어들을 전부 null 로 변경한다.

    # 워드 클라우드를 그린다.
    wordcloud = WordCloud(font_path='C://Windows//Fonts//gulim', # 글씨체
                          stopwords=STOPWORDS,   # 마침표, 느낌표,싱글 쿼테이션 등을 정제
                          max_words=1000, # 워드 클라우드에 그릴 최대 단어갯수
                          background_color='white', # 배경색깔
                          max_font_size = 100, # 최대 글씨 크기
                          min_font_size = 1, # 최소 글씨
                          mask = usa_mask, # 배경 모양
                          colormap='jet').generate(text).to_file('c:/project/'+f.replace('.txt','')+'_cloud.png')
                      # c 드라이브 밑에 project 폴더 밑에 생성되는 워드 클라우드 이미지 이름

    plt.figure(figsize=(15,15))            # 워드 클라우드의 가로 세로 사이즈
    plt.imshow(wordcloud, interpolation='bilinear')  # 글씨가 퍼지는 스타일
    plt.axis("off")
문제450. wordcloud2() 함수를 데이터 분석 자동화 스크립트에 추가하시오.
# 1. 중앙일보 분석 함수
def joongang(keyword, btn_num):
    from selenium.webdriver.common.keys import Keys # 키보드를 컴퓨터가 알아서 조정할 수 있도록 키 제공
    from  selenium  import  webdriver # 컴퓨터가 알아서 웹페이지를 움직일 수 있도록 하는 모듈
    from  bs4  import  BeautifulSoup  # html 코드에서 우리가 원하는 텍스트를 가져오게 하는 모듈
    import  urllib # url주소를 파이썬이 인식할 수 있도록 하는 모듈
    import   re # 데이터 정제 전문 모듈
    import time # 중간중간 sleep을 걸어서 서버에 부하를 주지 않게 함
     # 스크롤바를 내렸을때 바로 화면이 뜨지 않고 딜레이가 생김 > 그걸 기다리기 위한 시간이기도 함

    # 인공지능으로 중앙일보에서 검색했을때 나오는 페이지의 html 코드를 가져옵니다.
    list_url ="https://www.joongang.co.kr/search/news?keyword="+ keyword

    driver = webdriver.Chrome("C:\\data\\chromedriver_win32\\chromedriver.exe") # 크롬드라이버 불러옴
    driver.implicitly_wait(10) # 10초 기다림
    driver.get(list_url) # 위의 url을 가져옴

    for i in range(1,btn_num+1): # 반복하겠음. 무한반복하고 싶은 경우 while문 쓰면 됨.
        더보기 = driver.find_element_by_css_selector('a.btn.btn_outline_gray')
        더보기.send_keys('\n')  # 더보기 엔터를 쳐서 클릭하게 함
        time.sleep(3) # 기사로딩을 위해 3초 기다림
        driver.find_element_by_xpath("//body").send_keys(Keys.PAGE_DOWN)  # 페이지 다운


    html = driver.page_source   # 크롬브라우져에서 현재 불러온 html소스를 가져옴
    soup = BeautifulSoup(  html, "html.parser") # html코드를 BeautifulSoup으로 파싱함

    base = soup.select("h2.headline > a")  # html코드에서 h2 태그의 headline 클래스의 자식 테그인
                                            # a 태그의 html 문서들을 가져와라
    params=[] # 상세기사 url담을 리스트
    for  i  in  base[5:-5]:  #  중앙일보의 경우는 많이 본 뉴스가 상위 5개, 하위 5개를 제외
        params.append(i.get("href"))  #   a 태그 안에 있는 href 의 상세 url 을 가져옵니다.

    # 기사 본문 가져와서 저장
    f2 = open("c:\\data\\joongang_"+keyword+".txt","w",encoding = 'utf8')
    cnt = 0
    for i in params:  # # 상세 url for문으로 돌리기
        url = urllib.request.Request(i)
        f = urllib.request.urlopen(url).read().decode("utf-8")

        soup2 = BeautifulSoup(f, "html.parser")

        for k in soup2.find_all("div", class_ = "article_body fs3"):
            cnt+=1
            f2.write(str(cnt)+'. ' + re.sub('[\n\r\t]','',k.text)+'\n\n')

    f2.close()
    driver.quit()  # 브라우저를 닫음


# 2. 네이버 블로그 분석 함수
def naver_blog(keyword,page_num):

    # 모듈
    from selenium import webdriver
    from selenium.webdriver.common.keys import Keys
    from bs4 import BeautifulSoup
    from urllib import request as urlreq
    import time
    import re

    # 크롬 드라이버
    binary = "C:\\data\\chromedriver_win32\\chromedriver.exe"

    # 브라우저를 인스턴스화
    driver = webdriver.Chrome(binary)

    params = []
    for i in range(1,page_num+1):
        url = "https://section.blog.naver.com/Search/Post.naver?pageNo="+str(i)+"&rangeType=ALL&orderBy=sim&keyword="+keyword
        driver.get(url)
        time.sleep(1)
        html = driver.page_source

        soup = BeautifulSoup(html,'html.parser')
        base = soup.select('div.desc > a')
        for i in base:
            params.append(i.get('href'))

    params2 = list(set(params))

    from tqdm import tqdm_notebook  # 속도 진행상황

    f2 = open("c:\\data\\naver_blog_"+keyword+".txt","w",encoding = "utf8")

    for k in tqdm_notebook(params2):
        driver = webdriver.Chrome(binary)
        driver.get(k)

        element = driver.find_element_by_id("mainFrame") #iframe 태그 엘리먼트 찾기
        driver.switch_to.frame(element)

        html2 = driver.page_source

        soup2 = BeautifulSoup(html2, 'html.parser')

        #닉네임 크롤링
        try:
            overlays = ".nick"
            nick = driver.find_element_by_css_selector(overlays)   # 셀레니엄 메소드로 태그 찾기
            nickname = nick.text
            nickname = re.sub('[\n\r\t]','',nickname)

        #날짜 크롤링

            overlays = ".se_publishDate.pcol2"
            date = driver.find_element_by_css_selector(overlays)
            datetime = date.text

        #내용 크롤링
            content = soup2.select('div.se-component-content>div>div>p')

            f2.write('\n\nurl주소 : '+k)  # url 쓰기
            f2.write('\n작성날짜 : ' + datetime) # 날짜쓰기
            f2.write('\n블로그 작성자 : '+nickname +'\n')  # 닉네임 쓰기

            for i in content:
                if len(i.text) > 1:
                    f2.write(re.sub('[\n\r\t]','',i.text)+'\n')  # 내용 크롤링하면서 쓰기
        except:
            continue  # 예외처리 continue~

        driver.quit()


    f2.close()


# 3. 긍정,부정단어 감성분석
def word(keyword):
    # 1. 파일불러오기
    positive = open("c:\\data\\pos_pol_word.txt",encoding='utf-8-sig')
    pos= set(positive.read().split('\n'))   # 중복제거
    pos = list(filter((lambda x : x), pos))     # 결측치 제거

    negative = open("c:\\data\\neg_pol_word.txt",encoding='utf-8-sig')
    neg= set(negative.read().split('\n'))
    neg = list(filter((lambda x : x), neg))

    f = open("c:\\data\\"+keyword, encoding = 'utf8')
    f2 = f.read()

    # 2. 단어 정제
    pos = list(filter((lambda x: len(x)>1),pos))  # 한 글자 단어 제외처리
    pos.remove('^^')
    pos.remove('ㅎㅎ')

    neg.append('느끼') # 부정어 딕셔너리에 데이터 추가
    neg.append('물리')
    neg = list(filter((lambda x: len(x)>1),neg)) # 제외처리
    neg.remove('저는')
    neg.remove('마약')
    neg.remove(':)')
    neg.remove('ㅠㅠ ')
    neg.remove(':/')
    neg.remove('ㅠ_ㅠ')

    # 3. 데이터 프레임을 만들기 위한 딕셔너리 생성
    pos_dict = {}
    pos_dict['word'] = []
    pos_dict['cnt'] = []

    neg_dict = {}
    neg_dict['word'] = []
    neg_dict['cnt'] = []

    # 4. 데이터 입력
    for i in pos:
        if i in f2:
            pos_dict['word'].append(i)
            pos_dict['cnt'].append(f2.count(i))

    for i in neg:
        if i in f2:
            neg_dict['word'].append(i)
            neg_dict['cnt'].append(f2.count(i))

    # 5. 판다스 데이터 프레임 생성
    import pandas as pd

    pd.set_option('display.max_rows', None)  # 모든 행을 다 볼 수 있게 펼침

    df_pos = pd.DataFrame(pos_dict)   # 긍정단어 데이터프레임
    df_pos['순위'] = df_pos['cnt'].rank(ascending = False).astype('int')
    df_pos_rst = df_pos[:][df_pos['순위'] <= 100].sort_values(by = ['순위'], ascending = True)

    df_neg = pd.DataFrame(neg_dict)   # 부정단어 데이터프레임
    df_neg['순위'] = df_neg['cnt'].rank(ascending = False).astype('int')
    df_neg_rst = df_neg[:][df_neg['순위'] <= 100].sort_values(by = ['순위'], ascending = True)

    df_rst = [df_pos_rst,df_neg_rst] # 데이터 합치기
    df_rst2 = pd.concat(df_rst,keys=['positive','negative']) # 데이터프레임 라벨링

    print(df_rst2) # 판다스 데이터 프레임으로 return이 안됨 > 방법찾아야함


# 4. 워드클라우스 그리는 함수
def wordcloud2():

    ss = "c:\\data\\"
    f = input('파일명을 입력하세요~(예 : 할매떡볶이.txt) \n▶')

    # 텍스트마이닝 데이터 정제

    from wordcloud import WordCloud, STOPWORDS  # 시각화, 데이터 정제를 위한 모듈
    import matplotlib.pyplot as plt  # 그래프 그리는 모듈
    from os import path     #  os 에 있는 파일을 파이썬에서 인식하기 위해서
    import re   #  데이터 정제를 위한 모듈
    import numpy as np
    from PIL import Image  # 이미지 시각화를 위한 모듈

    # 워드 클라우드의 배경이 되는 이미지 모양을 결정
    usa_mask = np.array(Image.open("c:/project/usa_im.png"))

    # 워드 클라우드를 그릴 스크립트 이름 설정
    script = ss + f

    # 워드 클라우드를 그릴 스크립트와 os의 위치를 연결하여 utf8로 인코딩해서 한글 텍스트를
    # text 변수로 리턴한다.
    try:
        text = open( script , mode="r", encoding="utf-8").read()

        # 너무 공통적으로 자주 나오는 단어들을 제거하기 위한 작업
        file = open('c:/project/word.txt', 'r', encoding = 'utf-8')
        word = file.read().split(' ')   # 어절별로 분리함

        for i in word:
            text = re.sub(i,'',text)      # 스크립트에서 word 에 있는 단어들을 전부 null 로 변경한다.

        # 워드 클라우드를 그린다.
        wordcloud = WordCloud(font_path='C://Windows//Fonts//gulim', # 글씨체
                              stopwords=STOPWORDS,   # 마침표, 느낌표,싱글 쿼테이션 등을 정제
                              max_words=1000, # 워드 클라우드에 그릴 최대 단어갯수
                              background_color='white', # 배경색깔
                              max_font_size = 100, # 최대 글씨 크기
                              min_font_size = 1, # 최소 글씨
                              mask = usa_mask, # 배경 모양
                              colormap='jet').generate(text).to_file('c:/project/'+f.replace('.txt','')+'_cloud.png')
                          # c 드라이브 밑에 project 폴더 밑에 생성되는 워드 클라우드 이미지 이름

        plt.figure(figsize=(15,15))            # 워드 클라우드의 가로 세로 사이즈
        plt.imshow(wordcloud, interpolation='bilinear')  # 글씨가 퍼지는 스타일
        plt.axis("off")

        print('\n\nc:/project/'+f.replace('.txt','')+'_cloud.png에 저장되었습니다.')

    except:
        print('\n해당 파일을 찾을 수 없습니다.')


# 5. 데이터 분석 메인 함수
def my_data_visual():
    print('''
    ========= DATA SERVICE =========
    1. 중앙일보 기사 데이터 스크롤링
    2. 네이버 블로그 데이터 스크롤링
    3. 긍정, 부정단어 감성분석
    4. 워드 클라우드 그리기
    ================================
    ''')
    while True:
        num = int(input('번호를 선택하세요 \n▶ '))

        if num == 1:  # 중앙일보 선택
            keyword = input('\n키워드를 입력하세요 \n▶ ')
            btn_num = int(input('더보기를 몇 번 누를까요? \n▶ '))

            joongang(keyword, btn_num)

            print("\n\nc:\\data\\joongang_"+keyword+"에 저장되었습니다.")

        elif num == 2: # 네이버 블로그 선택
            keyword = input('\n키워드를 입력하세요 \n▶ ')
            page_num = int(input('페이지 몇 번까지 누를까요? \n▶ '))

            naver_blog(keyword,page_num)

            print("\n\nc:\\data\\naver_blog_"+keyword+"에 저장되었습니다.")

        elif num == 3: # 감성분석
            keyword = input('\n분석할 파일명을 입력하세요.(예시 : 떡군이네.txt) \n▶ ')

            word(keyword)

        elif num == 4: # 워드클라우드
            wordcloud2()

        else:
            print('번호를 잘못 입력했습니다.')
            continue
문제451. 할매떡볶이.txt에서 긍정 단어들만 따로 워드 클라우드로 시각화 하시오.
78 좋아 118 1
77 맛집 95 2
107 맛있게 44 3
121 좋은 32 4
50 좋아하는 32 4
:
:
워드클라우드에서 빈도수가 가장 많은 '좋아'가 가장 큰 글씨로 출력되려면 '좋아'라는 단어가 41개 들어있는 텍스트파일이 있어야함.
좋아 좋아 좋아 좋아 .....
conda install로 설치한 wordcloud 모듈의 함수가 텍스트 파일을 받아서 알아서 빈도수를 계산해서 빈도수가 높은 것은 큰 글씨로 나타나게 시각화 해야함.
def emotion(keyword):
    # 1. 파일불러오기
    positive = open("c:\\data\\pos_pol_word.txt",encoding='utf-8-sig')
    pos= set(positive.read().split('\n'))   # 중복제거
    pos = list(filter((lambda x : x), pos))     # 결측치 제거

    negative = open("c:\\data\\neg_pol_word.txt",encoding='utf-8-sig')
    neg= set(negative.read().split('\n'))
    neg = list(filter((lambda x : x), neg))

    f = open("c:\\data\\"+keyword, encoding = 'utf8')
    f2 = f.read()

    # 2. 단어 정제
    pos = list(filter((lambda x: len(x)>1),pos))  # 한 글자 단어 제외처리
    pos.remove('^^')
    pos.remove('ㅎㅎ')

    neg.append('느끼') # 부정어 딕셔너리에 데이터 추가
    neg.append('물리')
    neg = list(filter((lambda x: len(x)>1),neg)) # 제외처리
    neg.remove('저는')
    neg.remove('마약')
    neg.remove(':)')
    neg.remove('ㅠㅠ ')
    neg.remove(':/')
    neg.remove('ㅠ_ㅠ')

    # 3. 데이터 프레임을 만들기 위한 딕셔너리 생성
    pos_dict = {}
    pos_dict['word'] = []
    pos_dict['cnt'] = []

    neg_dict = {}
    neg_dict['word'] = []
    neg_dict['cnt'] = []

    # 4. 데이터 입력

    wrd_pos = open("c:\\data\\wrd_pos.txt","w", encoding = "utf-8-sig")
    for i in pos:
        if i in f2:
            pos_dict['word'].append(i)
            pos_dict['cnt'].append(f2.count(i))

            a = '\n'+str(i)+' '
            wrd_pos.write(a*f2.count(i)+'\n')  # 단어수만큼 단어 반복출력
    wrd_pos.close()

    wrd_neg = open("c:\\data\\wrd_neg.txt","w",encoding = "utf-8-sig")
    for i in neg:
        if i in f2:
            neg_dict['word'].append(i)
            neg_dict['cnt'].append(f2.count(i))

            a = '\n'+str(i)+' '
            wrd_neg.write(a*f2.count(i))  # 단어수만큼 단어 반복출력
    wrd_neg.close()


    # 5. 판다스 데이터 프레임 생성
#     import pandas as pd

#     pd.set_option('display.max_rows', None)  # 모든 행을 다 볼 수 있게 펼침

#     df_pos = pd.DataFrame(pos_dict)   # 긍정단어 데이터프레임
#     df_pos['순위'] = df_pos['cnt'].rank(ascending = False).astype('int')
#     df_pos_rst = df_pos[:][df_pos['순위'] <= 100].sort_values(by = ['순위'], ascending = True)

#     df_neg = pd.DataFrame(neg_dict)   # 부정단어 데이터프레임
#     df_neg['순위'] = df_neg['cnt'].rank(ascending = False).astype('int')
#     df_neg_rst = df_neg[:][df_neg['순위'] <= 100].sort_values(by = ['순위'], ascending = True)

#     df_rst = [df_pos_rst,df_neg_rst] # 데이터 합치기
#     df_rst2 = pd.concat(df_rst,keys=['positive','negative']) # 데이터프레임 라벨링

#     print(df_rst2) # 판다스 데이터 프레임으로 return이 안됨 > 방법찾아야함
자동화 함수에 모두 반영한 코드_최종
# 1. 중앙일보 분석 함수
def joongang(keyword, btn_num):
from selenium.webdriver.common.keys import Keys
from selenium import webdriver
from bs4 import BeautifulSoup
import urllib
import re
import time
# 인공지능으로 중앙일보에서 검색했을때 나오는 페이지의 html 코드를 가져옵니다.
list_url ="https://www.joongang.co.kr/search/news?keyword="+ keyword
driver = webdriver.Chrome("C:\\data\\chromedriver_win32\\chromedriver.exe") # 크롬드라이버 불러옴
driver.implicitly_wait(10)
driver.get(list_url)
for i in range(1,btn_num+1): # 반복하겠음. 무한반복하고 싶은 경우 while문 쓰면 됨.
더보기 = driver.find_element_by_css_selector('a.btn.btn_outline_gray')
더보기.send_keys('\n') # 더보기 엔터를 쳐서 클릭하게 함
time.sleep(3)
driver.find_element_by_xpath("//body").send_keys(Keys.PAGE_DOWN) # 페이지 다운
html = driver.page_source # 크롬브라우져에서 현재 불러온 html소스를 가져
soup = BeautifulSoup( html, "html.parser") # html코드를 BeautifulSoup으로 파싱함
base = soup.select("h2.headline > a")
params=[] # 상세기사 url담을 리스트
for i in base[5:-5]:
params.append(i.get("href"))
# 기사 본문 가져와서 저장
f2 = open("c:\\data\\joongang_"+keyword+".txt","w",encoding = 'utf8')
cnt = 0
for i in params: # # 상세 url for문으로 돌리기
url = urllib.request.Request(i)
f = urllib.request.urlopen(url).read().decode("utf-8")
soup2 = BeautifulSoup(f, "html.parser")
for k in soup2.find_all("div", class_ = "article_body fs3"):
cnt+=1
f2.write(str(cnt)+'. ' + re.sub('[\n\r\t]','',k.text)+'\n\n')
f2.close()
driver.quit() # 브라우저를 닫음
# 2. 네이버 블로그 분석 함수
def naver_blog(keyword,page_num):
# 모듈
from selenium import webdriver
from selenium.webdriver.common.keys import Keys
from bs4 import BeautifulSoup
from urllib import request as urlreq
import time
import re
# 크롬 드라이버
binary = "C:\\data\\chromedriver_win32\\chromedriver.exe"
# 브라우저를 인스턴스화
driver = webdriver.Chrome(binary)
params = []
for i in range(1,page_num+1):
url = "https://section.blog.naver.com/Search/Post.naver?pageNo="+str(i)+"&rangeType=ALL&orderBy=sim&keyword="+keyword
driver.get(url)
time.sleep(1)
html = driver.page_source
soup = BeautifulSoup(html,'html.parser')
base = soup.select('div.desc > a')
for i in base:
params.append(i.get('href'))
params2 = list(set(params))
from tqdm import tqdm_notebook # 속도 진행상황
f2 = open("c:\\data\\naver_blog_"+keyword+".txt","w",encoding = "utf8")
for k in tqdm_notebook(params2):
driver = webdriver.Chrome(binary)
driver.get(k)
element = driver.find_element_by_id("mainFrame") #iframe 태그 엘리먼트 찾기
driver.switch_to.frame(element)
html2 = driver.page_source
soup2 = BeautifulSoup(html2, 'html.parser')
#닉네임 크롤링
try:
overlays = ".nick"
nick = driver.find_element_by_css_selector(overlays) # 셀레니엄 메소드로 태그 찾기
nickname = nick.text
nickname = re.sub('[\n\r\t]','',nickname)
#날짜 크롤링
overlays = ".se_publishDate.pcol2"
date = driver.find_element_by_css_selector(overlays)
datetime = date.text
#내용 크롤링
content = soup2.select('div.se-component-content>div>div>p')
f2.write('\n\nurl주소 : '+k) # url 쓰기
f2.write('\n작성날짜 : ' + datetime) # 날짜쓰기
f2.write('\n블로그 작성자 : '+nickname +'\n') # 닉네임 쓰기
for i in content:
if len(i.text) > 1:
f2.write(re.sub('[\n\r\t]','',i.text)+'\n') # 내용 크롤링하면서 쓰기
except:
continue # 예외처리 continue~
driver.quit()
f2.close()
# 3. 긍정,부정단어 감성분석
def emotion(keyword):
# 1. 파일불러오기
positive = open("c:\\data\\pos_pol_word.txt",encoding='utf-8-sig')
pos= set(positive.read().split('\n')) # 중복제거
pos = list(filter((lambda x : x), pos)) # 결측치 제거
negative = open("c:\\data\\neg_pol_word.txt",encoding='utf-8-sig')
neg= set(negative.read().split('\n'))
neg = list(filter((lambda x : x), neg))
f = open("c:\\data\\"+keyword, encoding = 'utf8')
f2 = f.read()
# 2. 단어 정제
pos = list(filter((lambda x: len(x)>1),pos)) # 한 글자 단어 제외처리
pos.remove('^^')
pos.remove('ㅎㅎ')
neg.append('느끼') # 부정어 딕셔너리에 데이터 추가
neg.append('물리')
neg = list(filter((lambda x: len(x)>1),neg)) # 제외처리
neg.remove('저는')
neg.remove('마약')
neg.remove(':)')
neg.remove('ㅠㅠ ')
neg.remove(':/')
neg.remove('ㅠ_ㅠ')
neg.remove('ㅜㅜ ')
# 3. 데이터 프레임을 만들기 위한 딕셔너리 생성
pos_dict = {}
pos_dict['word'] = []
pos_dict['cnt'] = []
neg_dict = {}
neg_dict['word'] = []
neg_dict['cnt'] = []
# 4. 데이터 입력
wrd_pos = open("c:\\data\\wrd_pos_"+keyword.replace('.txt','')+".txt","w", encoding = "utf-8-sig")
for i in pos:
if i in f2:
pos_dict['word'].append(i)
pos_dict['cnt'].append(f2.count(i))
a = '\n'+str(i)+' '
wrd_pos.write(a*f2.count(i)) # 단어수만큼 단어 반복출력
wrd_pos.close()
print('\n긍정단어 리스트를 PC에 저장하였습니다.')
print('(저장위치 : '+'c:\\data\\wrd_pos_'+keyword.replace('.txt','')+'.txt)')
wrd_neg = open("c:\\data\\wrd_neg_"+keyword.replace('.txt','')+".txt","w",encoding = "utf-8-sig")
for i in neg:
if i in f2:
neg_dict['word'].append(i)
neg_dict['cnt'].append(f2.count(i))
a = '\n'+str(i)+' '
wrd_neg.write(a*f2.count(i)) # 단어수만큼 단어 반복출력
wrd_neg.close()
print('\n부정단어 리스트를 PC에 저장하였습니다.')
print('(저장위치 : '+'c:\\data\\wrd_neg_'+keyword.replace('.txt','')+'.txt)')
# 5. 판다스 데이터 프레임 생성
import pandas as pd
pd.set_option('display.max_rows', None) # 모든 행을 다 볼 수 있게 펼침
df_pos = pd.DataFrame(pos_dict) # 긍정단어 데이터프레임
df_pos['순위'] = df_pos['cnt'].rank(ascending = False).astype('int')
# df_pos_rst = df_pos[:][df_pos['순위'] <= 100].sort_values(by = ['순위'], ascending = True)
df_neg = pd.DataFrame(neg_dict) # 부정단어 데이터프레임
df_neg['순위'] = df_neg['cnt'].rank(ascending = False).astype('int')
# df_neg_rst = df_neg[:][df_neg['순위'] <= 100].sort_values(by = ['순위'], ascending = True)
df_rst = [df_pos,df_neg]
# df_rst = [df_pos_rst,df_neg_rst] # 데이터 합치기
df_rst2 = pd.concat(df_rst,keys=['positive','negative']) # 데이터프레임 라벨링
print('\n',df_rst2) # 판다스 데이터 프레임으로 return이 안됨 > 방법찾아야함
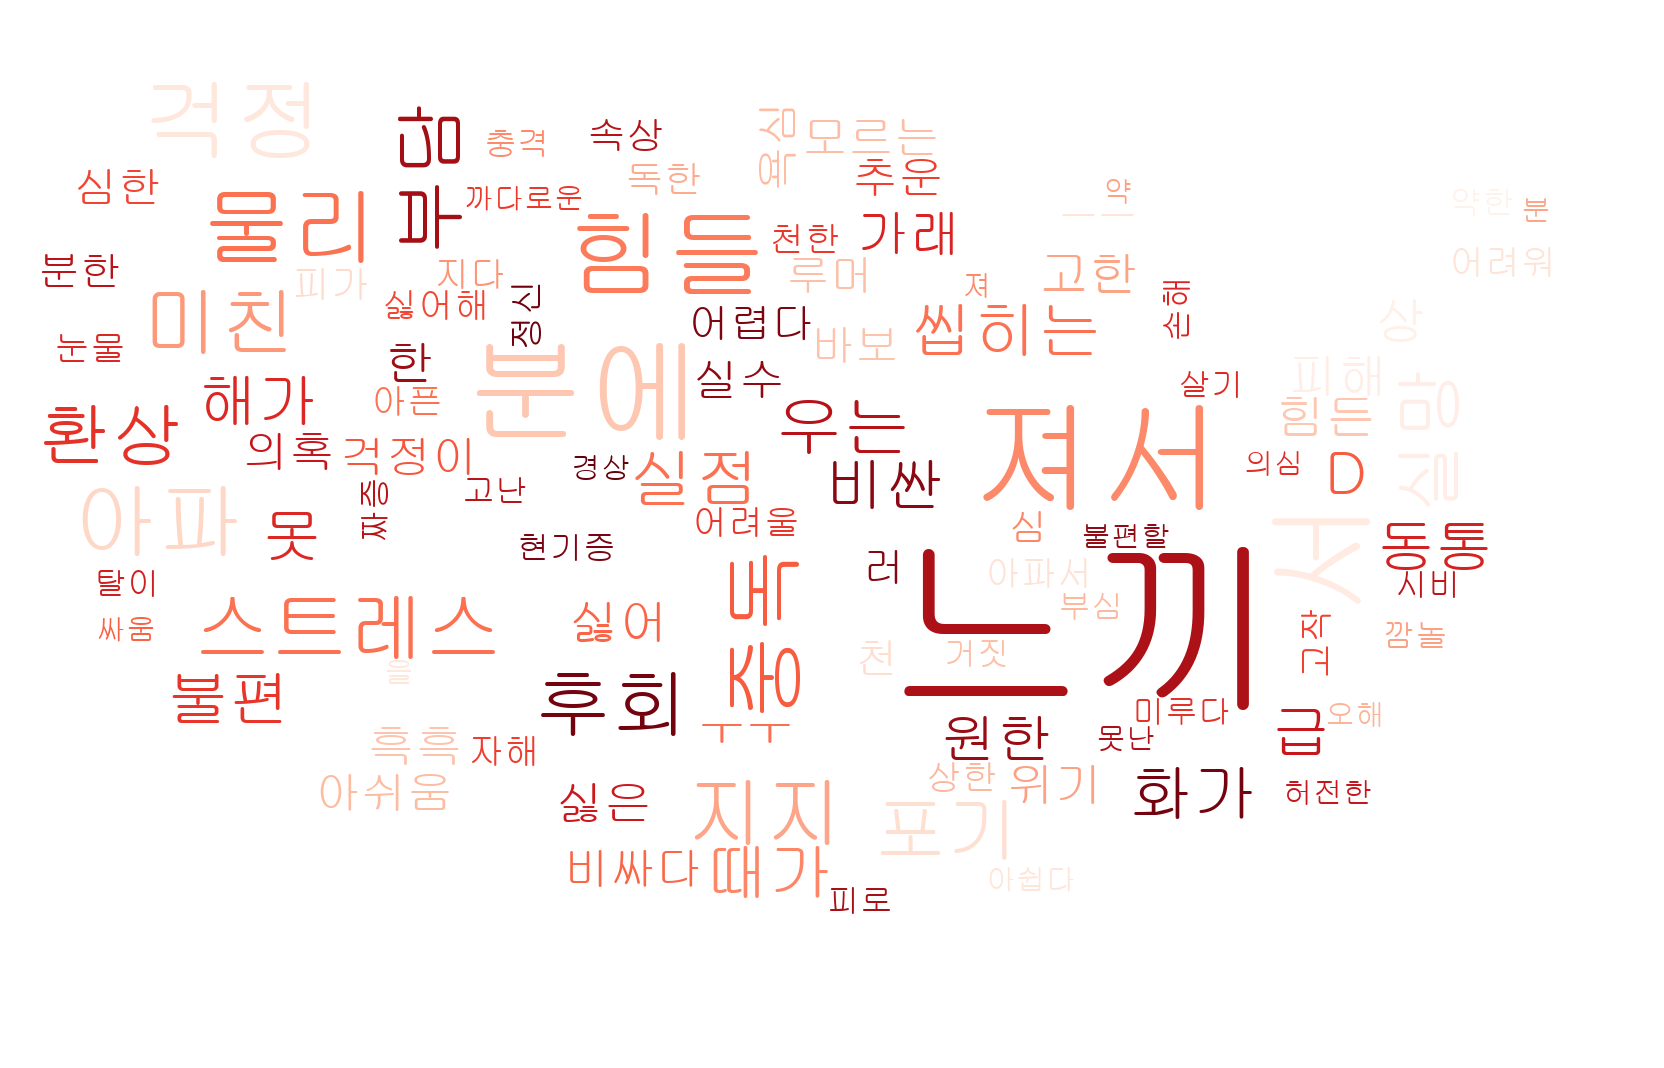
# 4. 워드클라우드 그리는 함수
def wordcloud2():
ss = "c:\\data\\"
f = input('파일명을 입력하세요~(예 : 할매떡볶이.txt) \n▶')
# 텍스트마이닝 데이터 정제
from wordcloud import WordCloud, STOPWORDS # 시각화, 데이터 정제를 위한 모듈
import matplotlib.pyplot as plt # 그래프 그리는 모듈
from os import path # os 에 있는 파일을 파이썬에서 인식하기 위해서
import re # 데이터 정제를 위한 모듈
import numpy as np
from PIL import Image # 이미지 시각화를 위한 모듈
# 워드 클라우드의 배경이 되는 이미지 모양을 결정
usa_mask = np.array(Image.open("c:/project/usa_im.png"))
# 워드 클라우드를 그릴 스크립트 이름 설정
script = ss + f
# 워드 클라우드를 그릴 스크립트와 os의 위치를 연결하여 utf8로 인코딩해서 한글 텍스트를
# text 변수로 리턴한다.
try:
text = open( script , mode="r", encoding="utf-8").read()
# 너무 공통적으로 자주 나오는 단어들을 제거하기 위한 작업
file = open('c:/project/word.txt', 'r', encoding = 'utf-8')
word = file.read().split(' ') # 어절별로 분리함
for i in word:
text = re.sub(i,'',text) # 스크립트에서 word 에 있는 단어들을 전부 null 로 변경한다.
# 워드 클라우드를 그린다.
wordcloud = WordCloud(font_path='C://Windows//Fonts//gulim', # 글씨체
stopwords=STOPWORDS, # 마침표, 느낌표,싱글 쿼테이션 등을 정제
max_words=100, # 워드 클라우드에 그릴 최대 단어갯수
background_color='white', # 배경색깔
max_font_size = 200, # 최대 글씨 크기
min_font_size = 20, # 최소 글씨
mask = usa_mask, # 배경 모양
colormap='Reds', # 글씨 컬러 팔레트
collocations = False # 중복 제거
).generate(text).to_file('c:/project/'+f.replace('.txt','')+'_cloud.png')
# c 드라이브 밑에 project 폴더 밑에 생성되는 워드 클라우드 이미지 이름
plt.figure(figsize=(15,15)) # 워드 클라우드의 가로 세로 사이즈
plt.imshow(wordcloud, interpolation='bilinear') # 글씨가 퍼지는 스타일
plt.axis("off")
except:
print('\n해당 파일을 찾을 수 없습니다.')
# 5. 데이터 분석 메인 함수
def my_data_visual():
print('''
========= DATA SERVICE =========
1. 중앙일보 기사 데이터 스크롤링
2. 네이버 블로그 데이터 스크롤링
3. 긍정, 부정단어 감성분석
4. 워드 클라우드 그리기
================================
''')
num = int(input('번호를 선택하세요 \n▶ '))
if num == 1: # 중앙일보 선택
keyword = input('\n키워드를 입력하세요 \n▶ ')
btn_num = int(input('더보기를 몇 번 누를까요? \n▶ '))
joongang(keyword, btn_num)
print("\n\nc:\\data\\joongang_"+keyword+"에 저장되었습니다.")
elif num == 2: # 네이버 블로그 선택
keyword = input('\n키워드를 입력하세요 \n▶ ')
page_num = int(input('페이지 몇 번까지 누를까요? \n▶ '))
naver_blog(keyword,page_num)
print("\n\nc:\\data\\naver_blog_"+keyword+"에 저장되었습니다.")
elif num == 3: # 감성분석
keyword = input('\n분석할 파일명을 입력하세요.(예시 : 떡군이네.txt) \n▶ ')
emotion(keyword)
elif num == 4: # 워드클라우드
wordcloud2()
else:
print('번호를 잘못 입력했습니다.')문제453. (오늘의 마지막 문제) 떡군이네3.txt로 감성 분석해서 긍정 워드클라우드와 부정 워드클라우드 그림을 출력하시오.
| 긍정이미지 | 부정이미지 |
 |
 |