Study/class note
딥러닝 / VGG16 동결
chanzae
2022. 4. 30. 17:45
ㅇ vgg16 신경망 동결 시킨것과 동결 시키지 않은것의 차이 (코랩에서 진행)
동결(freezing) 한다는 것운 훈련기간동안 가중치가 업데이드 되지 않도록 막는다는 뜻이다.
# vgg16을 사용해서 학습 시키기 실험

# 필요한 패키지 임폴트 받기
from tensorflow.keras.models import Sequential
from tensorflow.keras.layers import Conv2D, MaxPool2D, Dense, Flatten, BatchNormalization, Activation, Dropout
from tensorflow.keras.optimizers import Adam

from tensorflow.keras.applications import VGG16  # VGG16 신경망 설계도를 가져옵니다.

#2. cifar10 데이터를 준비합니다.

# 데이터 준비하기
from tensorflow.keras.datasets import cifar10
import numpy as np

(x_train, y_train), (x_test, y_test) = cifar10.load_data()

# 데이터를 표준화 합니다.
# 평균과 표준편차는 채널별로 구해줍니다.

x_mean = np.mean(x_train, axis = (0, 1, 2))  # 평균값을 구합니다.
x_std = np.std(x_train, axis = (0, 1, 2))  # 표준편차를 구합니다.

x_train = (x_train - x_mean) / x_std  # 훈련 데이터를 표준화 합니다.
x_test = (x_test - x_mean) / x_std # 테스트 데이터를 표준화 합니다.

# 밑바닥 부터 시작하는 딥러닝 책에서는 min/max 정규화를 사용했었습니다.
# 여기서는 표준화를 하고 있는데 vgg 라고 해서 꼭 표준화를 하는건 아닙니다.
# min/max 정규화를 해도 됩니다.

#3. 훈련 데이터를 검정 데이터로 나눕니다.

from sklearn.model_selection import train_test_split

x_train, x_val, y_train, y_val = train_test_split(x_train, y_train, test_size = 0.1, random_state = 777)

# 훈련 데이터의 일부를 떼서 테스트 데이터(검정 데이터)로 사용하면서 훈련 시킵니다.

#4. vgg16 신경망을 가져옵니다.

# imagenet을 학습한 모델을 불러옵니다.
vgg16 = VGG16(weights = 'imagenet', input_shape = (32, 32, 3), include_top = False)  # include_top = False 완전연결계층 알아서 분류 하겠음
vgg16.summary()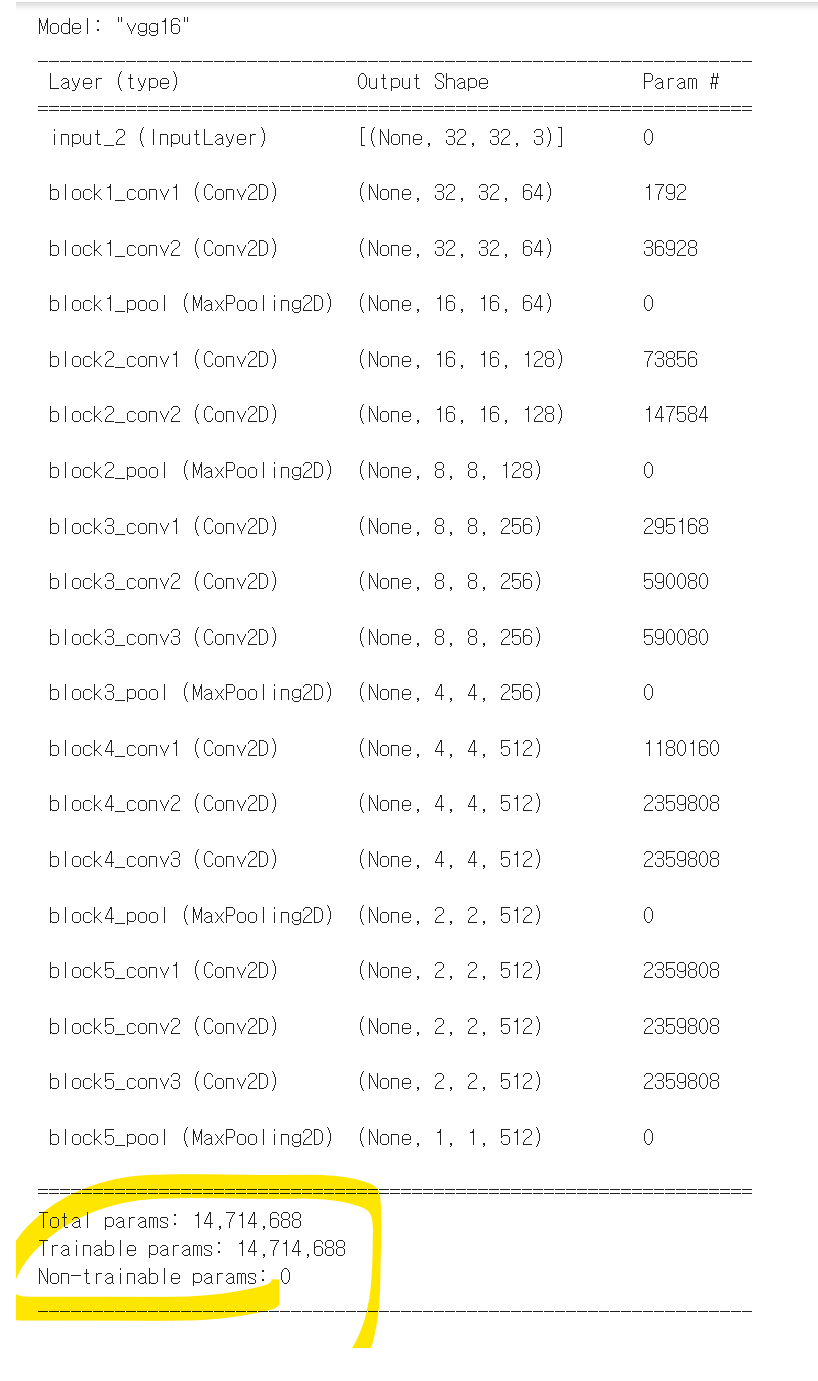
1. 동결해제 했을 때
cnt = 0
for layer in vgg16.layers[:]:
    layer.trainable = True  # False 는 동결 (option), True 는 동결해제(기본값)
    print(layer)
    cnt = cnt + 1
print(cnt)
#7. vgg16 신경망에 완전 연결계층을 붙입니다.
model = Sequential()
# vgg16 모델을 사용합니다.
model.add(vgg16)
# 분류기를 직접 정의합니다.
model.add(Flatten())
model.add(Dense(256))
model.add(BatchNormalization())
model.add(Dropout(0.4))
model.add(Activation('relu'))
model.add(Dense(10, activation = 'softmax')) #클래스 분류에 따라 출력층 뉴런의 수 달라짐#8. 모델을 설정합니다.
model.compile(optimizer = Adam(1e-4), # 러닝레이트를 0.0001 로 지정하면서 Adam 을 쓰겠다고 합니다.
loss = 'sparse_categorical_crossentropy',
metrics = ['acc'])
model.summary()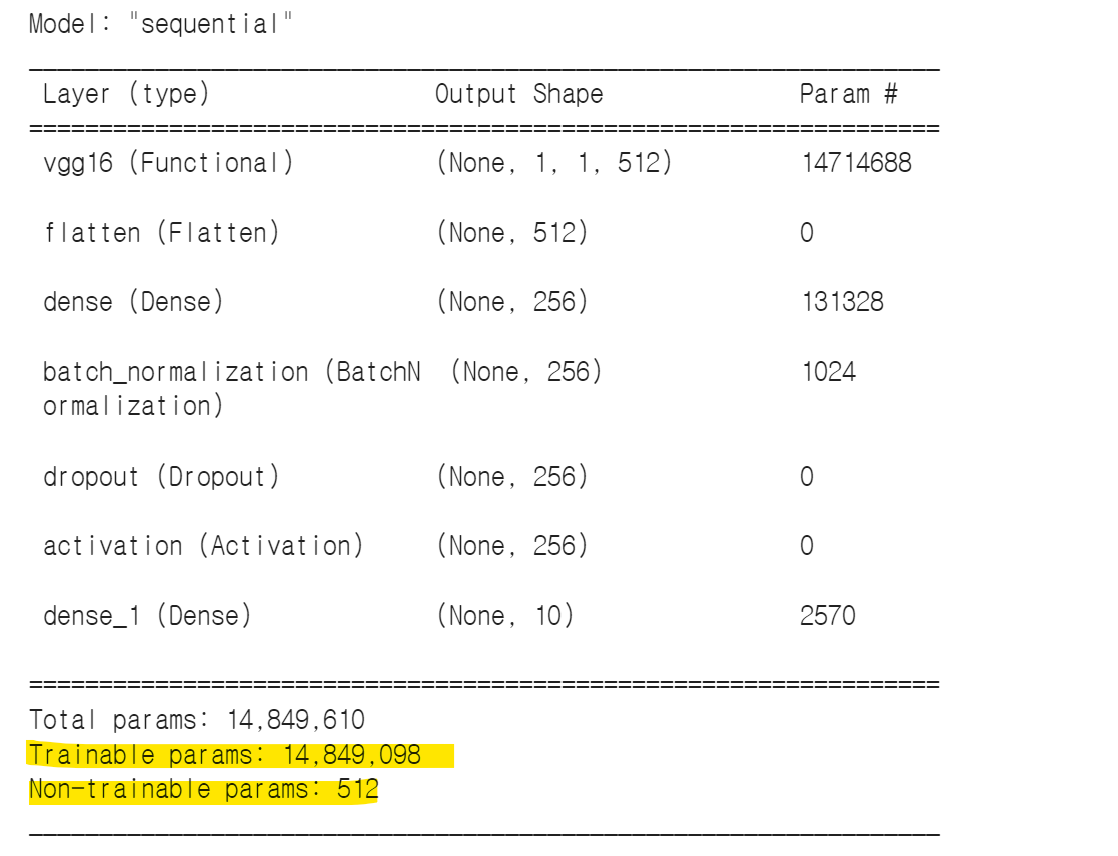
합성곱층 레이어의 가중치도 동결해제했기 때문에 훈련가능한 파라미터 14,849,098
#9. 조기종료 옵션을 지정합니다.

from keras.callbacks import ModelCheckpoint, EarlyStopping

callbacks = [ EarlyStopping(monitor='val_acc', patience=10, verbose=1) ]


#10. 모델을 훈련시킵니다.

history = model.fit(x_train, y_train,epochs = 200, batch_size=100,validation_data = (x_val, y_val),callbacks=callbacks)
2. 동결했을 때
cnt = 0
for layer in vgg16.layers[:]:
    layer.trainable = False  # False 는 동결 (option), True 는 동결해제(기본값)
    print(layer)
    cnt = cnt + 1
print(cnt)
#7. vgg16 신경망에 완전 연결계층을 붙입니다.
model = Sequential()
# vgg16 모델을 사용합니다.
model.add(vgg16)
# 분류기를 직접 정의합니다.
model.add(Flatten())
model.add(Dense(256))
model.add(BatchNormalization())
model.add(Dropout(0.4))
model.add(Activation('relu'))
model.add(Dense(10, activation = 'softmax'))#8. 모델을 설정합니다.
model.compile(optimizer = Adam(1e-4), # 러닝레이트를 0.0001 로 지정하면서 Adam 을 쓰겠다고 합니다.
loss = 'sparse_categorical_crossentropy',
metrics = ['acc'])
model.summary()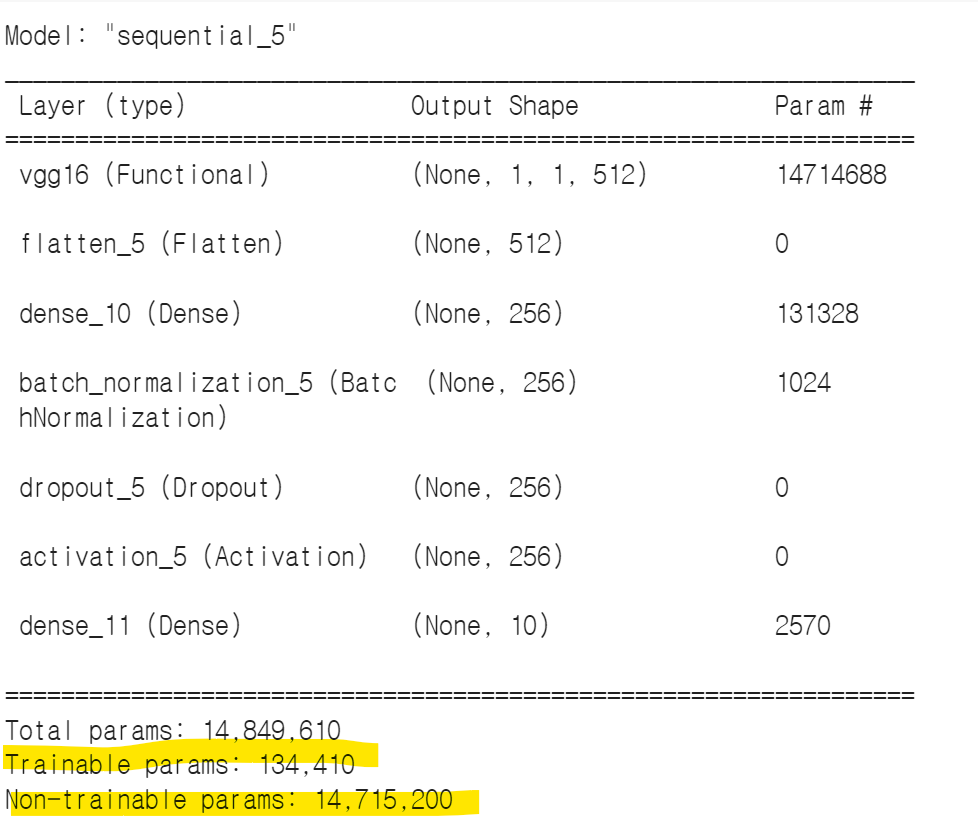
동결했을 때 정확도가 훨씬 낮게 나옴. 합성곱층의 가중치를 모두 동결히켰기 때문에 훈련 가능한 파라미터 134.410개.
아래의 코드를 사용해서 vgg16가중치를 동결 혹은 동결해제 했을 때 테스트 결과 동결을 해제하고 다시 새롭게 가중치를 생성한게 더 좋은 결과가 나왔음.
cnt = 0
for layer in vgg16.layers[:]:
    layer.trainable = False  # False 는 동결 (option), True 는 동결해제(기본값)
    print(layer)
    cnt = cnt + 1
print(cnt)
아래의 한줄이면 vgg16 모델 설계도를 쉽게 가져올 수 있음.
from tensorflow.keras.applications import VGG16

vgg16 = VGG16(weights = 'imagenet', input_shape = (32,32,3), include_top = False)
반응형